Introduction:
Your router’s gateway IP address is a critical piece of information that plays a pivotal role in your home network. It acts as the bridge between your local network and the wider internet. Sometimes, there are valid reasons to change this gateway IP address, such as network optimization or security concerns. In this guide, we will walk you through the steps to change your router’s gateway IP address.
Why Change Your Router's Gateway IP Address?
Before we delve into the process, it’s essential to understand why you might want to change your router’s gateway IP address:
- Network Optimization: Changing the gateway IP address can help resolve IP conflicts or optimize network performance by choosing an IP range that suits your needs.
- Security: Altering the gateway IP address can add an extra layer of security to your network by making it more challenging for potential intruders to access your router’s settings.
- Troubleshooting: In some cases, changing the gateway IP address can resolve connectivity issues or conflicts with other devices on your network.

Steps to Change Your Router's Gateway IP Address:
Step 1: Access Your Router’s Settings
To change your router’s gateway IP address, you need to access its web-based configuration page. To do this, follow these general steps:
- Connect your computer to the router either via Ethernet cable or a wireless connection.
- Open a web browser and enter the default gateway IP address in the address bar. Typically, the default gateway IP address is 192.168.1.1 or 192.168.0.1, but it may vary depending on your router’s make and model. Refer to your router’s manual or search online for the specific default gateway IP address.
- Log in to your router’s administration panel using the username and password. If you haven’t changed these credentials before, you can often find the default username and password on a label on the router itself or in the user manual.
Step 2: Change the Gateway IP Address
Once you’ve accessed your router’s settings, follow these steps to change the gateway IP address:
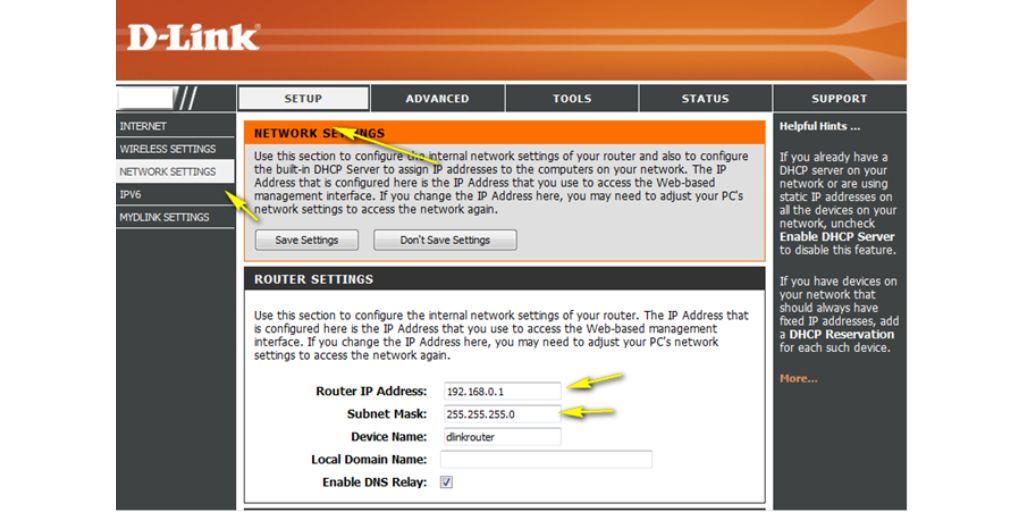
- Look for an option called “LAN,” “Network Setup,” or something similar in your router’s settings menu.
- Locate the current gateway IP address and subnet mask settings. Write down these values in case you need to revert to the previous settings.
- Change the gateway IP address to your desired value. Make sure it falls within a private IP address range, such as 192.168.0.1 to 192.168.255.255 or 10.0.0.0 to 10.255.255.255.
- Update the subnet mask if necessary. It’s usually set to 255.255.255.0 for small home networks.
Step 3: Save and Reboot
After changing the gateway IP address, save your settings and reboot the router. This step ensures that the changes take effect.
Step 4: Reconfigure Devices
Remember that altering the gateway IP address will affect all devices connected to your network. You may need to reconfigure devices with static IP addresses manually to match the new gateway IP address.
Conclusion :
Changing your router’s gateway IP address can be a useful step for optimizing your home network and enhancing security. However, it’s essential to be cautious when making such changes, as mistakes can disrupt your network. Always document your existing settings, follow the manufacturer’s instructions, and consider seeking professional assistance if you’re unsure about the process. With the right precautions, you can successfully change your router’s gateway IP address and fine-tune your network to meet your specific needs.

